> For the complete documentation index, see [llms.txt](https://help.blotato.com/llms.txt). Markdown versions of documentation pages are available by appending `.md` to page URLs; this page is available as [Markdown](https://help.blotato.com/features/dm-automations.md).

# DM Automations Guide

A DM automation sends a direct message on your behalf when someone comments on your post or sends you a message. Set it up once, and Blotato replies for you.

DM Automations are available on every paid plan. You manage them in the Blotato web app or through ChatGPT, Claude, Hermes, or another AI tool connected to Blotato MCP.

DM automations work on Instagram and Facebook Pages. Twitter/X, TikTok, LinkedIn, Pinterest, Threads, Bluesky, and YouTube are not supported at this time.

## Tutorials

1. Follow [Facebook and Instagram DM Automation with Claude, ChatGPT, and Blotato](https://www.sabrina.dev/p/facebook-instagram-dm-automation-with-claude-chatgpt-blotato) for the video tutorial and copy-and-paste prompts.
2. Watch [Automate Your Entire Social Media Funnel with Claude](https://www.youtube.com/watch?v=0OS4m5Kajt0) for a second video walkthrough.

Each automation has three parts:

* **One or two triggers.** The events Blotato listens for: a comment on your post, a direct message someone sends you, or both.
* **Keywords.** Optional words or phrases the comment or message must contain.
* **A message.** The text Blotato sends back, plus up to 3 link buttons.

Three optional steps extend an automation:

* **A follow gate.** Holds your message back until the person follows your Instagram account.
* **An email gate.** Holds your message back until the person replies with an email address. On automations published after September 14, 2026, a contact with an email already on file skips it.
* **A webhook.** Calls your own endpoint once your message goes out.

Blotato runs the steps in a fixed order: follow gate, email gate, your message, webhook.

## Before You Start

Blotato needs permission to read comments and read/send messages on your account.

If you connected your account before messaging, comments, or (for Instagram) follow gating launched, reconnect it so Blotato has the new permissions.

For Instagram comment triggers, the connected Instagram account must own the post. DM automations do not run on posts where your account appears only as a collaborator. If you co-authored a post, create the automation from the Instagram account that originally published the post.

**Reconnect before you use a follow gate.** Blotato subscribes your account to button-tap events at connect time. An account connected before DM automations and follow gating landed carries no such subscription, so taps on the follow-gate button do not reliably reach Blotato. Reconnecting the account fixes it. Reconnect in [Settings > Social Accounts](https://my.blotato.com/settings).

* For Instagram, see [Connect Instagram](/settings/social-accounts/instagram.md).
* For Facebook, see [Connect Facebook](/settings/social-accounts/facebook.md).

## Create a DM Automation

1. Go to [Automations](https://my.blotato.com/dm-automations).
2. Click **New automation**.
3. Pick the connected Instagram account or Facebook Page the automation runs on.
4. Name the flow, for example "Auto-DM links from comments".
5. Click **Create flow**.

The connected account is locked for the flow after creation. To use a different account, create a new flow.

## Set the Triggers

An automation listens for comments, direct messages, or both. Blotato allows one comment trigger and one message trigger per automation. One matching comment or message starts a single run.

1. Open the automation from [Automations](https://my.blotato.com/dm-automations).
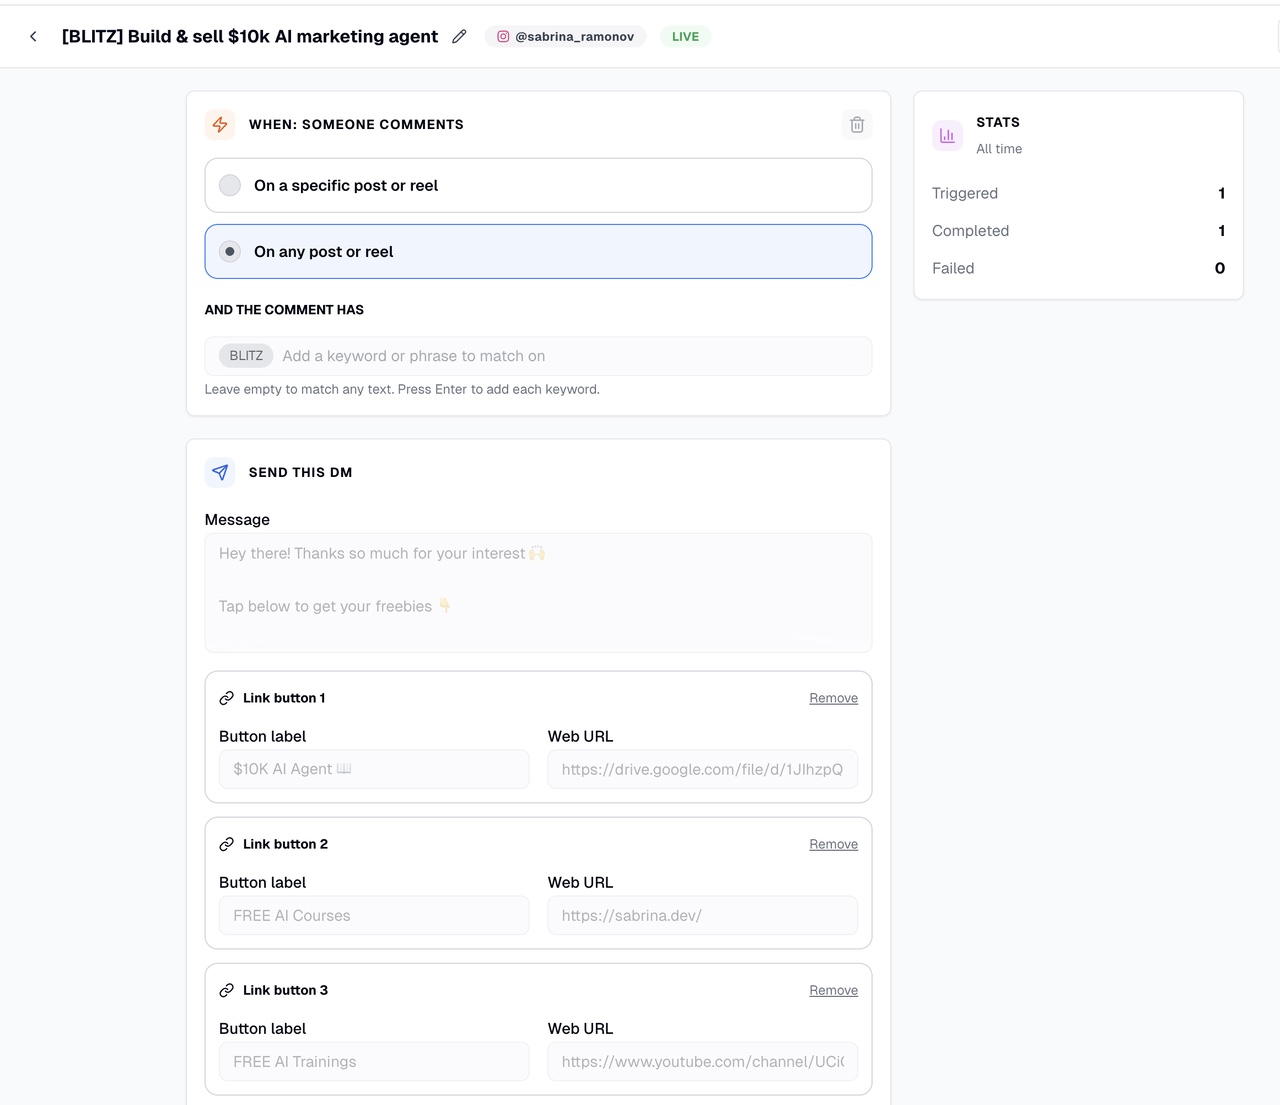
2. In the **When someone…** card, check **Comments**, **Sends a DM**, or both.
3. For **Comments**, pick **On a specific Post or Reel** or **On any Post or Reel**.
4. For a specific post, search your published posts and select one. The post picker lists posts published through Blotato only. See [Targeting a Specific Post](#targeting-a-specific-post).
5. Add keywords in the **And the comment has** field. The label reads **And the message has** or **And the comment or message has**, depending on the triggers you checked. Press Enter after each keyword.
6. Leave the keyword field empty to fire on every comment or message.

Both triggers share one keyword list in the web app.

### How Keywords Match

* Matching ignores upper and lower case. `PRICE` matches `price`.
* A keyword matches as a whole word. `price` matches "what is the price?" and skips "pricey".
* A multi-word keyword tolerates line breaks. `lead magnet` matches a comment with "lead" and "magnet" on separate lines.
* An automation fires when the comment or message contains **any one** of your keywords.
* Blotato matches text only. A photo, video, voice note, sticker, or reaction without text never starts a run.

### Targeting a Specific Post

**The post picker lists posts published through Blotato only.** A post you published directly in the Instagram or Facebook app, in Meta Business Suite, or through another tool never appears in the picker.

A post published through Blotato also stays out of the picker in three cases:

* **It went out on a different connected account.** The picker lists posts from the connected account the automation runs on.
* **It has not published yet.** A scheduled post joins the list once it publishes.
* **It is older than the 20 newest posts.** Type part of the post's caption into **Search your Posts and Reels** to find it.

To automate replies on a post published outside Blotato:

1. Pick **On any Post or Reel**.
2. Add the keyword your post asks people to comment, for example `GUIDE`.

The automation answers the keyword on every post and reel on the account. To target a future post by itself, publish it through Blotato.

Instagram collaborator posts do not trigger DM automations for the collaborator account. Use the Instagram account that owns the post.

## Write the Message

A new automation starts with a sample message ("Tap below to get your link") and one **View link** button pointing to `https://blotato.com`. Replace both before you publish.

1. Type the message in the **Message** field. The limit is 640 characters. Instagram also caps a message at 1000 bytes, and emoji and accented letters take several bytes each. See [Instagram Limitations](/platforms/instagram/limitations.md#message-length).
2. To give recipients a link to open, click **Add a button**. Skip this step when your message does not need a link.
3. Enter the **Button label**, up to 20 characters.
4. Enter the **Web URL** the button opens.
5. Repeat for up to 3 buttons.
6. Click **Remove** beside any link button you do not want to send.

Link buttons are optional. The **Button label** is the text a recipient sees. The **Web URL** is the page the button opens. This Web URL is separate from the **URL** under **Call a webhook**, which sends automation data to your endpoint after the message goes out. To collect an email address and send it to n8n, Zapier, Make.com, or a CRM without a link, remove every link button and turn on **Ask for an email address** and **Call a webhook**.

Link buttons are the only button type you author on your message. To send tappable reply chips or capture-the-tap buttons, use the [Messages API](/api/messages.md#buttons-and-quick-replies). A follow gate adds a confirm button Blotato manages, and you set its label only.

**Buttons show in the Instagram mobile app only.** Someone reading your DM on instagram.com in a desktop browser sees the message text with no buttons under it. Instagram sets this behavior, and no Blotato setting changes it.

**For Instagram, use a button or a plain-text URL, not both.** A message carrying both leaves the URL unclickable on desktop, so a desktop reader ends up with no working link at all. Pick one based on your audience:

* **Mostly mobile.** Keep the link button and leave the URL out of the message text.
* **Mostly desktop.** Remove the button and put the URL in the message text instead.

## Ask for a Follow (Instagram Only)

A follow gate holds your message back until the person follows your Instagram account.

1. Open the automation from [Automations](https://my.blotato.com/dm-automations).
2. Turn on **Ask for a follow**.
3. Type the message in the **Message** field, up to 640 characters. Ask them to follow you.
4. Type the **Button label**, up to 20 characters. The default is "I'm following".
5. Click **Save and Publish**.

Here is what the person sees:

1. They comment or message with your keyword.
2. Blotato sends the follow-gate message with a button under it.
3. They follow your account and tap the button.
4. Blotato checks whether they follow you.
5. Following, they get your message. Not following, they get the follow-gate message again.

The follow gate runs on Instagram only. A Facebook automation rejects it.

### Follow Gate Rules

* **The gate message always goes first.** Instagram grants Blotato access to follower status once the person opens a DM thread with your account, so Blotato asks them first and checks second.
* **The person has 30 days to respond.** With no reply inside the window, the run ends as expired and nothing else sends.
* **An unknown follower status sends your message.** Instagram withholds follower status for someone who never granted profile access. Blotato sends your message rather than blocking them.
* **A confirmed follow lasts 30 days.** Blotato reuses the result for 30 days, so a repeat contact skips the check. A "not following" result is never reused.
* **Any reply moves the gate forward.** Blotato runs the follower check on the person's next DM, whatever it says. The button is a shortcut, not a requirement.

### Write the Gate Message for Desktop Readers

Instagram renders DM buttons in the Instagram mobile app only. Someone reading on instagram.com in a desktop browser sees your gate message with no button under it, and with nothing to tap they stall until the window closes.

Write the gate message so it works either way:

1. Ask them to follow the account.
2. Ask them to reply with a word, for example "Reply FOLLOWING once you have."
3. Leave the button label as it is for the mobile readers.

Blotato runs the follower check on any text reply, so a desktop reader who types the word moves forward exactly like a mobile reader who taps the button.

An audience reading mostly on desktop needs the reply instruction. Leaving the message to say "tap the button below" alone strands them.

## Ask for an Email Address

An email gate holds your message back until the person replies with an email address.

1. Open the automation from [Automations](https://my.blotato.com/dm-automations).
2. Turn on **Ask for an email address**.
3. Type the message in the **Message** field, up to 640 characters. Ask them to reply with their email.
4. Click **Save and Publish**.

Here is what the person sees:

1. They comment or message with your keyword.
2. Blotato sends the email-gate message.
3. They reply with their email address.
4. Blotato reads the first email address in the reply and saves it to the contact.
5. They get your message.

On automations published after September 14, 2026, a contact with an email already on file skips steps 2 to 4. See [Email Gate Rules](#email-gate-rules).

A reply with no email address in it returns the email-gate message, and Blotato waits again.

The email gate runs on Instagram and Facebook Pages.

### Email Gate Rules

* **A contact with an email already on file skips the gate.** They get your message without the email question. An email lands on file when the contact replies with an address to any email gate on the same connected account. This applies to automations published after September 14, 2026. To apply it to an older automation, open it, click **Edit**, then click **Save and Publish**.
* **The person has 72 hours to reply.** With no reply inside the window, the run ends as expired.
* **Blotato reads the first email address in the reply.** A reply holding two addresses saves the first one.
* **Blotato saves the address to the contact record.** Add a webhook to receive it.
* **A nonexistent address still passes.** Blotato checks the shape of the address, not whether the mailbox exists.

## Call a Webhook

A webhook tells your own system a DM went out. Blotato calls your endpoint after your message sends.

1. Open the automation from [Automations](https://my.blotato.com/dm-automations).
2. Turn on **Call a webhook**.
3. Pick the **Method**: `GET`, `POST`, `PUT`, `PATCH`, or `DELETE`.
4. Enter the **URL**, up to 2048 characters.
5. Click **Add a header** to send an API key or another header your endpoint needs.
6. Click **Save and Publish**.

### What Blotato Sends

Every method except `GET` carries a JSON body. `GET` carries no body.

```json
{ "email": "them@example.com", "isFollower": true }
```

* `email` is the address on file for the person, captured by an email gate. It is `null` when Blotato holds none.
* `isFollower` is the follower status a follow gate last recorded. It is `null` when Blotato never checked.

Both keys arrive on every request except `GET`, with or without a gate on the automation.

### Webhook Rules

* **The URL needs a public address.** Blotato rejects private, loopback, link-local, and cloud metadata addresses. A `localhost` endpoint or an internal `10.x` address fails.
* **Blotato waits 15 seconds.** A slower endpoint does not stop the run. Blotato logs **External request timed out** as a warning, the run still completes, and Blotato does not retry the request.
* **Blotato does not follow redirects.** Point the automation at the final URL.
* **An error response does not stop the automation.** Your endpoint answering `500` gets logged with its status, and the run still completes. A blocked address, a DNS failure, or a connection error fails the run with error code 20304.
* **Blotato reads the first 16 KB of your response.** Longer responses get cut.
* **Your headers stay out of the logs.** Blotato redacts them, so an API key in a header never lands in a log entry. The URL and the request body do appear in the run logs, so keep keys out of the URL.

This webhook is separate from the [webhook publish target](/api/publish-post.md), which sends post content to your endpoint at publish time.

## Publish

1. Click **Publish** to take the automation live.
2. The status badge switches from **Draft** to **Live**.

An automation needs at least one trigger that is turned on, a message of 1 to 640 characters, and valid button URLs before it goes live. A gate you turned on needs its own message, and a webhook you turned on needs a valid `http(s)` URL.

Edits to a live automation publish as soon as you click **Save and Publish**. Edits to a draft stay saved until you publish. A run already in progress keeps the version it started with, so someone waiting on a gate gets the message from before your edit.

Click **Move to Draft** to stop an automation. It stops responding to new comments and messages. Runs already in flight finish.

## Update a Single Trigger

A live automation shows a switch beside each trigger, in the **When someone…** card and on the automation's card in [Automations](https://my.blotato.com/dm-automations). Use it to pause one trigger while the other keeps running.

1. Find the trigger you want to pause.
2. Turn its switch off.

The change applies immediately, with no republish. The trigger keeps its post and keywords, so you turn it back on the same way. At least one trigger stays on: the switch on the last active trigger is disabled. To stop the whole automation, click **Move to Draft**.

To change a trigger's post or keywords, click **Edit**, update the trigger, then click **Save and Publish**.

## Test a Comment Trigger

**Your own comments do not trigger a DM automation.** Blotato skips comments posted by the same Instagram account or Facebook Page connected to the automation.

1. Publish the automation.
2. Sign in to a different Instagram or Facebook account.
3. Comment on the target post using one of the automation's keywords.
4. Confirm the other account receives the direct message.
5. Open the automation and review its runs and logs.

## Read the Stats

The **Stats** card on an automation shows all-time totals:

| Stat      | Meaning                                                                                                   |
| --------- | --------------------------------------------------------------------------------------------------------- |
| Started   | Times a comment or message matched a trigger and started a run.                                           |
| Succeeded | Runs where every step finished, including the DM.                                                         |
| Failed    | Runs ending on an error, including a webhook error after the DM went out. Open the run to read the error. |

A run stays open until the message settles, so **Succeeded** plus **Failed** is sometimes lower than **Started**. A run where someone never answered a follow gate or an email gate ends as expired, and a run replaced by a newer run ends as superseded. Expired and superseded runs count under **Started** alone.

The API and MCP report the same totals as `triggered`, `completed`, and `failed`.

## Reuse an Automation on Another Account

Duplicate an automation to run the same message on a second account.

1. Go to [Automations](https://my.blotato.com/dm-automations).
2. Open the menu on the automation you want to copy.
3. Click **Duplicate**.
4. Pick the account to copy it to.
5. Click **Duplicate flow**.

The copy takes the name of the original with `(copy)` on the end, and it carries over the triggers, the message, the buttons, the follow gate, the email gate, and the webhook.

Three things to check after duplicating:

* Review the triggers and point the comment trigger at your targeted post on the new account. The post picker lists posts published through Blotato to the new account only.
* Review the webhook. The copy calls the same endpoint as the original, so your endpoint starts receiving runs from a second account.
* The copy lands as a **Draft**. Open it and click **Publish** to take it live.

You may only duplicate to accounts on the same platform. An Instagram automation copies to another Instagram account, never to a Facebook Page.

## Platform Rules

Instagram and Facebook set the rules below, not Blotato. A message outside an allowed window fails.

* **Comment trigger.** Blotato answers with a private reply to the comment. Instagram and Facebook allow one private reply per comment, within 7 days of the comment. A comment you already replied to privately, through Blotato or another tool, rejects the second reply.
* **Message trigger.** Blotato replies within 24 hours of the person's last message.
* **No cold outreach.** An automation answers people who comment or message first. Blotato does not message people who never contacted you.
* **Your own activity never triggers.** Comments you post and messages you send do not start a run.
* **A reply during a gate continues the run.** While an automation waits on someone's answer, their next DM resumes the waiting run instead of starting a new one.
* **Button taps never start a run.** Tapping the follow-gate button continues the run it belongs to.

## Overlapping Automations

Blotato checks every live automation on the account for each comment and message.

* **Each matching automation starts its own run.** Two automations matching the same comment both try to answer it. One reply reaches the person, and the other run fails. Two automations matching the same direct message both send.
* **Every matching comment starts a new run.** Someone who comments your keyword twice gets two replies.
* **A newer gate replaces an older one.** When a second run asks the same person a gate question, their older waiting run ends as superseded.

Keep one live automation per keyword on each account.

## Limits

| Limit                                    | Value                                          |
| ---------------------------------------- | ---------------------------------------------- |
| Triggers per automation                  | 2, one comment trigger and one message trigger |
| Message length                           | 640 characters                                 |
| Instagram message size                   | 1000 bytes                                     |
| Follow gate or email gate message length | 640 characters                                 |
| Link buttons per message                 | 3                                              |
| Button label                             | 20 characters                                  |
| Follow gate button label                 | 20 characters                                  |
| Automation name                          | 60 characters                                  |
| Reply window on a follow gate            | 30 days                                        |
| Reply window on an email gate            | 72 hours                                       |
| Webhook URL length                       | 2048 characters                                |
| Webhook timeout                          | 15 seconds                                     |

### Active contacts

Every DM an automation sends counts toward your monthly active-contacts limit, the same as a message you send yourself. Reaching the same person twice in a month counts once.

For more information, see [Active Contacts](/settings/billing-and-credits.md#active-contacts).

## Troubleshooting

**My post does not appear in the post picker.**

The post picker lists posts published through Blotato only.

1. Confirm you published the post through Blotato. A post published directly in the Instagram or Facebook app never appears.
2. Confirm the post went out on the connected account the automation runs on. On Facebook, confirm the post belongs to the automation's own Page.
3. Confirm the post already published. A scheduled post appears once it publishes.
4. Type part of the post's caption into **Search your Posts and Reels**. The picker shows the 20 newest posts until you search.
5. For a post published outside Blotato, pick **On any Post or Reel** and add the keyword your post asks people to comment.

See [Targeting a Specific Post](#targeting-a-specific-post).

**The automation shows Live but never fires.**

1. Confirm the trigger's switch is on. A trigger turned off does not fire, even on a live automation.
2. Confirm your Blotato subscription is active. While it is inactive, new comments and messages start no run, and Blotato does not replay them after you reactivate.
3. Confirm the comment or message contains one of your keywords as a whole word. A photo, sticker, or voice note without text never starts a run.
4. For a specific-post trigger, confirm the comment landed on the post you selected.
5. Confirm the comment came from a different account. Your own comments never trigger the automation.
6. For a Facebook automation, confirm the Page still appears in [Settings > Social Accounts](https://my.blotato.com/settings). A removed Page stops receiving comments and messages.
7. If you connected your account before messages and comments were released, reconnect the account in [Settings > Social Accounts](https://my.blotato.com/settings) and confirm the account has access.

**Runs show as Failed.**

Open the automation and read the run error and error logs. Common causes: the 24-hour messaging window closed, the comment already received a private reply, the connected account expired, another DM tool on the account controls the conversation, or the webhook failed after the DM went out. See [Messaging Errors](/support/errors.md#messaging-errors) and [DM Automation Errors](/support/errors.md#dm-automation-errors).

**The follow-gate button does nothing when tapped.**

1. Reconnect the Instagram account in [Settings > Social Accounts](https://my.blotato.com/settings). Blotato subscribes your account to button-tap events at connect time, and an account connected before DM automations and follow gating landed never receives them.
2. Republish the automation and test it again.
3. Ask the person to reply with any text message instead. Blotato runs the follower check on any text reply, so a typed reply advances the run the same way.

**Nobody gets past the follow gate on desktop.**

Instagram shows DM buttons in the Instagram mobile app only, so a desktop reader sees no button to tap. Edit the gate message to ask them to reply with a word, for example "Reply FOLLOWING once you have." Blotato runs the follower check on any text reply.

**Someone keeps getting the follow-gate message.**

Blotato re-sends the gate message every time the check returns "not following". Ask the person to follow the account first, then tap the button. Someone who taps the button without following stays in the loop until the 30-day window closes.

**The email gate keeps asking for an email.**

Blotato reads an email address out of the reply text. A reply with a typo in the address, or with the address written as "name at example dot com", returns the gate message again.

**The email gate never asks for an email.**

On automations published after September 14, 2026, a contact with an email already on file skips the email gate. The contact replied with an address to an email gate on the same connected account in an earlier run, so Blotato sends your message without asking again.

To see the email question while testing, comment or message from an account with no email on file.

**The webhook never fires.**

1. Confirm the DM sent. Blotato calls the webhook after your message goes out, so a failed DM stops the run first.
2. Open the run logs and read the **Sending external request** and **Received external response** entries.
3. Confirm the URL points at a public address. Blotato rejects private and loopback addresses.
4. Confirm your endpoint answers inside 15 seconds. A slower answer logs **External request timed out**, and Blotato does not retry the request.

**The DM arrives, but the buttons are missing.**

1. Ask the recipient which device they used. Instagram shows DM buttons in the mobile app only, so buttons stay hidden on instagram.com in a desktop browser.
2. For a desktop audience, remove the button and put the URL in the message text instead. Keeping both leaves the URL unclickable on desktop.
3. Confirm every button has a valid `http(s)` URL.

## Build Automations with ChatGPT, Claude, Hermes, OpenClaw, or Another MCP Client

1. Complete the [Blotato MCP setup](/api/mcp/setup.md).
2. Start a new chat in your AI tool.
3. Ask: "Walk me through how to set up Blotato DM Automations."
4. Provide the account, one or two triggers (comments, DMs, or both), optional keywords, message, and up to three link buttons.
5. Add the optional steps you want: a follow gate for Instagram, an email gate, and a webhook URL with its method.
6. Review the automation before activating it.

Your AI tool works with Blotato MCP to create, edit, list, activate, deactivate, and archive automations, and to update single triggers, for example to turn one on or off. Ask for automation analytics to review triggered, completed, and failed totals.

## Example: Turn One Comment Into a CRM Lead

Use this workflow in ChatGPT, Claude, Hermes, OpenClaw, Codex, or another AI tool connected to Blotato MCP.

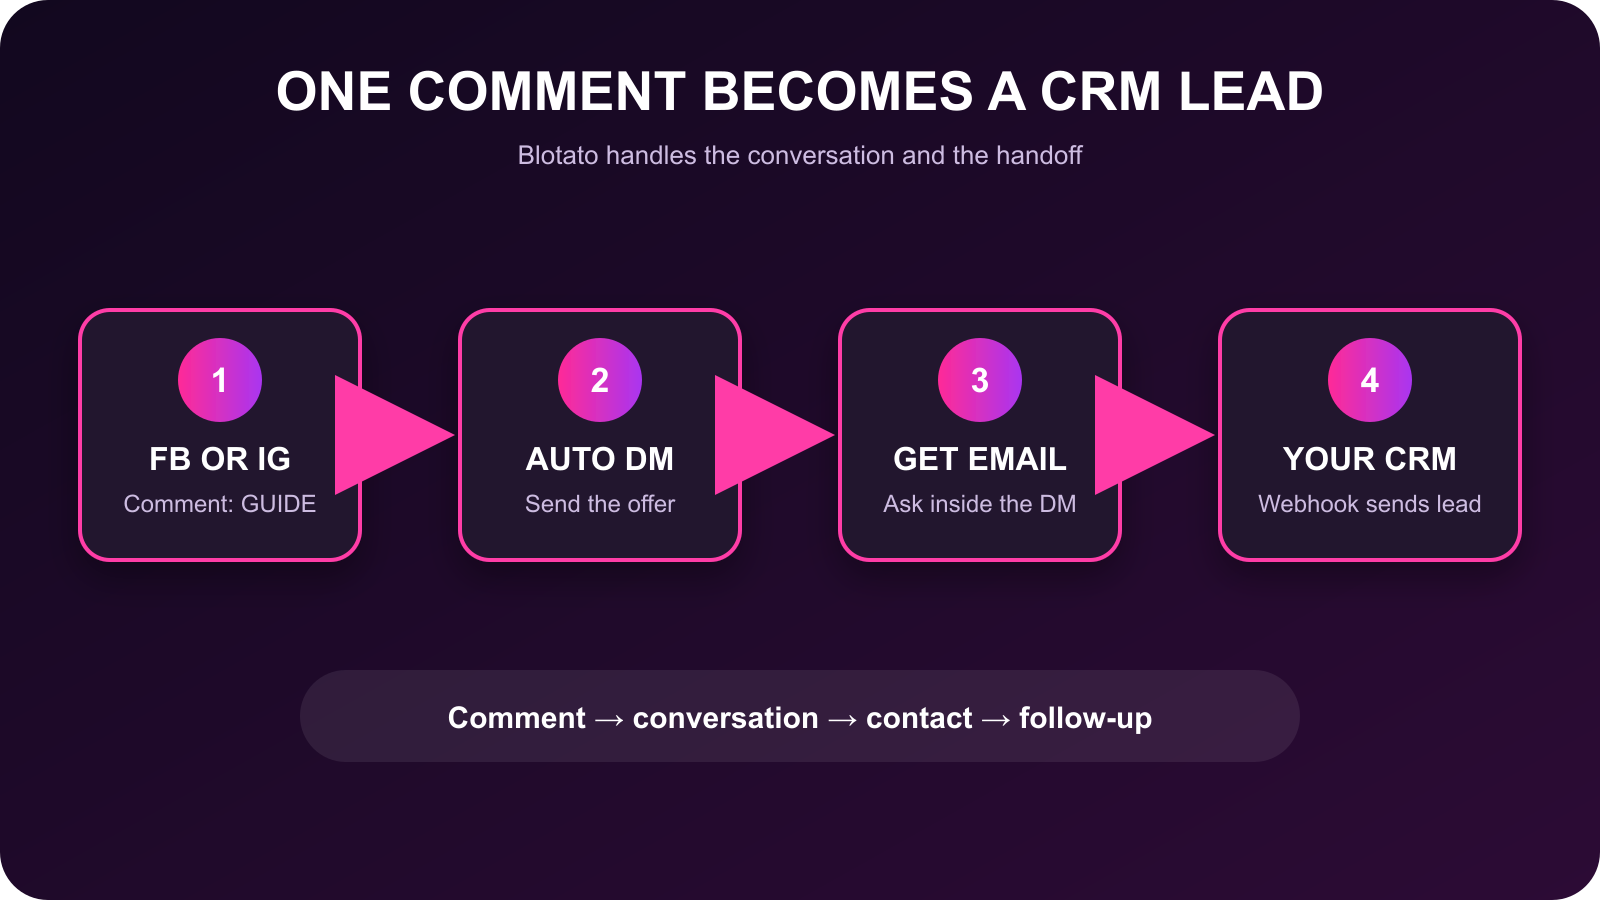
Someone comments `GUIDE` on Facebook or Instagram. Blotato asks for an email address, sends the guide, and posts the captured email to your CRM webhook.

`Comment → DM → Email → CRM`

### 1. Connect Blotato

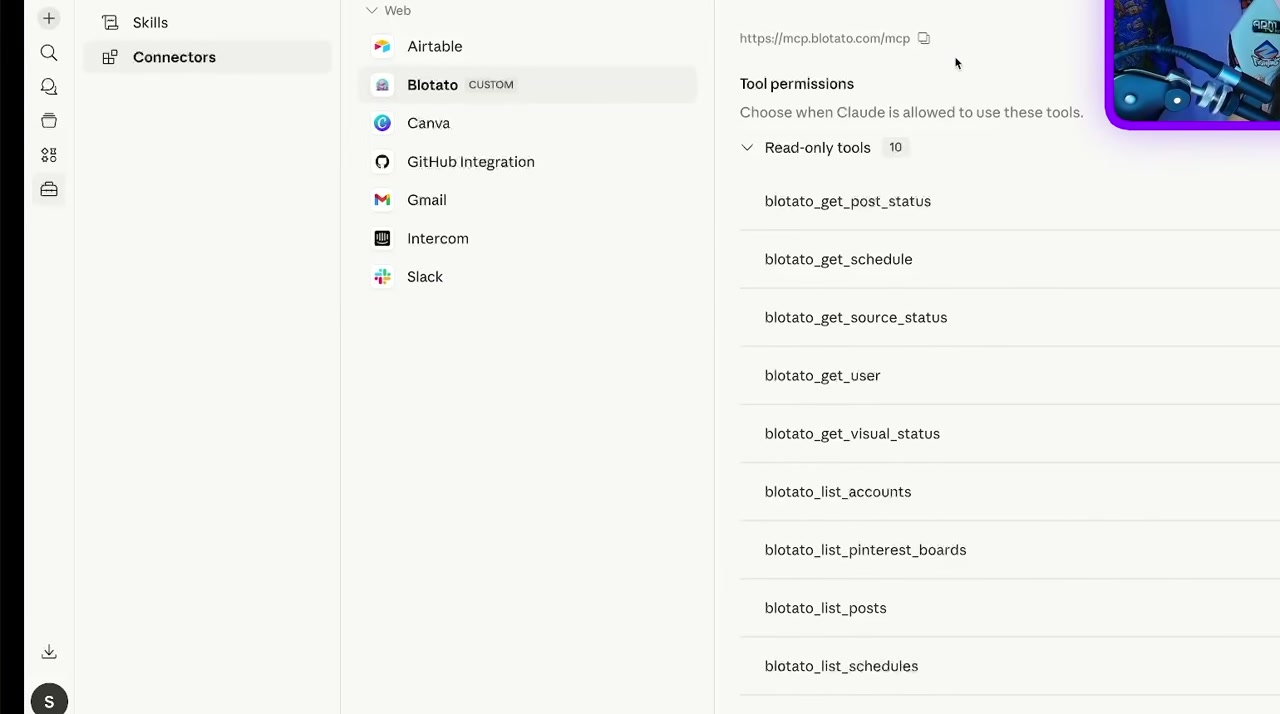
1. Open [Blotato Settings → API](https://my.blotato.com/settings/api).
2. Complete the [Blotato MCP setup](/api/mcp/setup.md) for your AI tool.
3. Start a new chat in your AI tool.
4. Ask: `List my connected Blotato social accounts.`
5. Confirm the response includes your Facebook Page and Instagram account.

<figure><img src="https://2374509648-files.gitbook.io/~/files/v0/b/gitbook-x-prod.appspot.com/o/spaces%2FevfU9S4Nh53PiGflQLah%2Fuploads%2Fgit-blob-1911fccf25587ae16eadc40ee1a033b36418cdb1%2Fdm-automation-mcp-connector.jpg?alt=media" alt="Blotato MCP connector configured in Claude"><figcaption><p>This example shows Blotato MCP connected in Claude. The same workflow applies to other MCP clients.</p></figcaption></figure>

### 2. Create the Facebook and Instagram Automations

Each DM Automation targets one connected account. Create one automation for your Facebook Page and one for your Instagram account.

1. Replace `GUIDE`, `[GUIDE URL]`, and `[CRM WEBHOOK URL]` in this prompt:

   > Create separate Facebook and Instagram comment-to-DM automations in Blotato. Use my connected Facebook Page and Instagram account. When someone comments `GUIDE` on any post, ask, "Where should I send the guide?" and wait for an email address. After Blotato captures the email, send, "Here is your free guide: \[GUIDE URL]." Then send a POST request containing the captured email to my CRM webhook at `[CRM WEBHOOK URL]`. Create both automations as inactive drafts. Show me the configuration for each automation before activation.
2. Send the completed prompt to your AI tool.
3. Ask: `List my DM Automations and show the account, triggers, keyword, email gate, message, webhook, and status for each one.`
4. Confirm one draft targets Facebook and one draft targets Instagram.
5. Open [Automations](https://my.blotato.com/dm-automations).
6. Review the account, `GUIDE` keyword, email question, guide link, and CRM webhook on both drafts.

<figure><img src="https://2374509648-files.gitbook.io/~/files/v0/b/gitbook-x-prod.appspot.com/o/spaces%2FevfU9S4Nh53PiGflQLah%2Fuploads%2Fgit-blob-04852edfffa0ee175a0fdca68bd5582a325b59ca%2Fdm-automation-builder-example.jpg?alt=media" alt="Blotato DM Automation builder showing a comment keyword and automatic direct message"><figcaption><p>Review each draft in the Blotato DM Automation builder before activation.</p></figcaption></figure>

### 3. Activate the Automations

1. Ask: `Activate the Facebook and Instagram GUIDE automations.`
2. Ask: `List both automations and confirm their status is active.`

### 4. Test the Full Flow

Test from accounts with no email on file. On automations published after September 14, 2026, a contact with an email already on file skips the email question.

1. Comment `GUIDE` on your Facebook post from another Facebook account.
2. Confirm the Facebook account receives the email question in a private message.
3. Reply with a test email address.
4. Confirm the Facebook account receives the guide message.
5. Confirm your CRM receives the test contact.
6. Repeat the test on Instagram from another Instagram account.
7. Ask: `Show the latest runs and logs for both GUIDE automations.`
8. Confirm each test run completed.

<figure><img src="https://2374509648-files.gitbook.io/~/files/v0/b/gitbook-x-prod.appspot.com/o/spaces%2FevfU9S4Nh53PiGflQLah%2Fuploads%2Fgit-blob-71e89190d74821c13f9ead3329fb9efca3406239%2Fdm-automation-comment-to-crm.png?alt=media" alt="Flow diagram showing a Facebook or Instagram comment becoming a CRM lead"><figcaption><p>The automation turns a comment into a direct-message conversation, captured email, and CRM contact.</p></figcaption></figure>

To review performance later, ask: `Show the triggered, completed, and failed totals for my GUIDE automations.`

## Build Automations with the API

Every setting on this page is available through the API and the MCP server.

* [DM Automations API](/api/dm-automations.md) for the REST endpoints.
* [MCP Tools Reference](/api/mcp/tools.md#automations) for the AI agent tools.


---

# Agent Instructions
This documentation is published with GitBook. GitBook is the documentation platform designed so that both humans and AI agents can read, navigate, and reason over technical content effectively. Learn more at gitbook.com.

## Querying This Documentation
If you need additional information that is not directly available in this page, you can query the documentation dynamically by asking a question.

Perform an HTTP GET request on the current page URL with the `ask` query parameter, and the optional `goal` query parameter:

```
GET https://help.blotato.com/features/dm-automations.md?ask=<question>&goal=<endgoal>
```

`ask` is the immediate question: it should be specific, self-contained, and written in natural language.
`goal` is optional and describes the broader end goal you are ultimately trying to accomplish on behalf of the user. GitBook uses it to tailor the answer towards what is most useful for that goal.

The response will contain a direct answer to the question and relevant excerpts and sources from the documentation.

Use this mechanism when the answer is not explicitly present in the current page, you need clarification or additional context, or you want to retrieve related documentation sections.